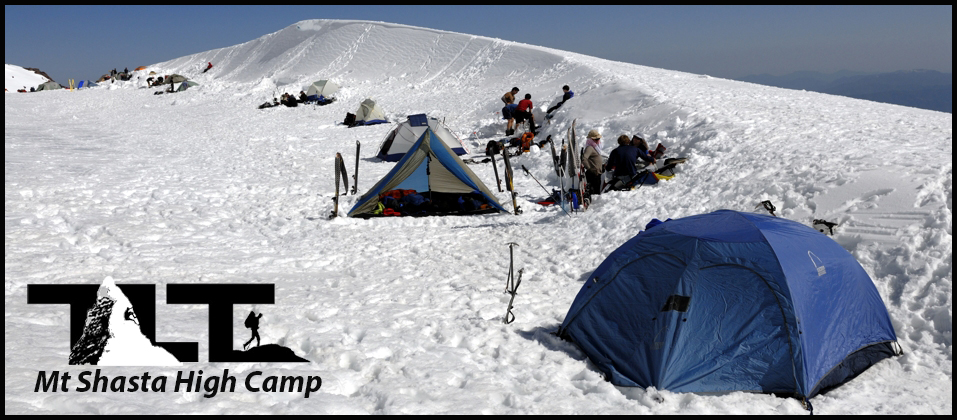
 High Camp on Mt Shasta is by far and a way associated with Lake Helen. Perched at 10,400 feet above sea level, it proves to be the customary half way point on the mountain. Lake Helen is not your typical lake. I have been to Lake Helen four times during different months, and I have never seen any water there (although I have seen a cool photo taken in late September when the Lake was melted out in all its glacial green tinged glory). In the photo above, we are camped in the blue tent closest to the foreground. On a good day there will be lots of campers at Lake Helen. Here they are set up in a nice semi-circle. The tents provide for a colorful scene when viewed from up higher on the mountain.
The snow in spring provides for a comfortable base for camping out, provided you have proper insulation below your sleeping bag. Make sure you anchor your tent well. Stiff winds can come up, and the last thing you need is your tent coming loose and tumbling down the slopes of Mt Shasta. The natural snow bank in the upper image, however, did provide for some wind protection.
 We started out at Bunny Flat around mid morning, and got to Lake Helen around mid afternoon. As soon as we get there, we set up our tent, and get to work on obtaining water for the day and the next days adventure. From past experience, I have found that my son Ben and I need about five quarts of water for summit day, while my son Sean usually needs far less. But he opts to carry the same amount of water, just in case someone else in the party runs out.
This means we need to melt down nearly 5 gallons of water (especially when you add the cooking and cleaning needs to the whole equation). This takes time to say the least.
On our last trip to Shasta, I brought along two stoves and a couple of bottles of fuel to greatly speed things up. That added up to quite a bit of weight. These days a "Pocket Rocket" stove weighs next to nothing, and works great for melting down snow and for cooking dinner. In the above image, you see me working on the task of melting down snow for our needs. On this trip we brought along two stoves just to speed things up.
We started out at Bunny Flat around mid morning, and got to Lake Helen around mid afternoon. As soon as we get there, we set up our tent, and get to work on obtaining water for the day and the next days adventure. From past experience, I have found that my son Ben and I need about five quarts of water for summit day, while my son Sean usually needs far less. But he opts to carry the same amount of water, just in case someone else in the party runs out.
This means we need to melt down nearly 5 gallons of water (especially when you add the cooking and cleaning needs to the whole equation). This takes time to say the least.
On our last trip to Shasta, I brought along two stoves and a couple of bottles of fuel to greatly speed things up. That added up to quite a bit of weight. These days a "Pocket Rocket" stove weighs next to nothing, and works great for melting down snow and for cooking dinner. In the above image, you see me working on the task of melting down snow for our needs. On this trip we brought along two stoves just to speed things up.
 In the image to the left above you can see another teams cooking area. They used lightweight snow shovels to dig out platforms for cooking and for storing some of the groups gear.
Even though we did not take along shovels, they could prove to be life savers in the sad event of someone getting buried in an avalanche. Another invaluable instrument for avalanche safety, would be transmitters, beacons, and/or finders. Finders are cool, but it is necessary for all in your party to have one in order to be effective, and they need to be tuned into each other. In the case of an avalanche, the involved individual needs to press the "Find Me" button. Then the others in the group need to press their "Find" button to locate the buried climber. Shovels come into play for digging a person out. Even though this equipment is not mandatory on Mt Shasta, if you have the funds (the equipment is not cheap, but what's your life worth?) it would be a very good idea to carry it. On some mountains, authorities are beginning to require these instruments in order for you to get permits to climb.
 In the photo to the right above you see an image of what comes next after Lake Helen as you proceed up the slopes. The route marked with the thin blue line represents the steepest section of the climb at around 35 degrees in angle.
In early season,you want to actually stay more to the right as you climb, and then head for the notch just to the left of "The Thumb" Another option would be to head through one of the cliffs on the "Red Banks" This may be a better option later in the season.
The reason for the above is because the glacier on the other side of the mountain (behind "The Thumb"), melts out and leaves a nice big crevasse between you and your next objective. This gap makes for a highly treacherous crossing later in the season. Thus you need to bypass this bergschrund (crevasse) by heading left through one of the "Red Banks" chimneys.
 Many climbers carried snowboards or skis for the descent. In the photo you see climbers all set up for the trip down the mountain. Though I did not envy them on the way up (due to the fact that they had to carry this extra weight as they ascended), I have to say that I got a bit jealous later on while watching them disappear into the distance as we slogged through the soft snow.
Some climbers brought along cross country skis, and this option proved to be the best choice of all. Cross country skis provided efficient travel for both the uphill and downhill portions of the journey.
For us who were on foot, a sitting glissade worked well as long as we had at least a 20 degree slope on the way down. For more on the subject of glissading, check out our short video at the following link How to Glissade.
 To the right Above you see my two sons Sean and Ben walking out on frozen Lake Helen just before turning in for the night. We usually go to sleep around 7 or 8 pm when mountaineering. This way we can get a nice early alpine start in the morning.
The Shasta Climbing Ranger, who was camped along side the rest of us on Lake Helen that night, made the effort to come by each of our tents and answer any questions we may have had. He also went over the expected conditions on the mountain for the following day.
The Shasta Ranger encouraged us all to get started climbing by 2 AM so that we could make it to the summit and be back to camp at Lake Helen by noon the next day. This is not only wise when it comes to avoiding the danger of avalanche, but it also helps out tremendously when it comes to getting up the mountain more efficiently. I cannot emphasize enough how much work it is when you have to pull your leg out of a two foot hole for each step you take.
 Pre dawn conditions when the snow pack is still nice a frozen give you as a climber a big advantage over late morning starts (when things heat up and snow becomes soft).
Another benefit of using Lake Helen for a short layover before going to the summit, is to be able to watch a beautiful sunset high up on the mountain. Photos of Avalanche Gulch and the upper Red Banks are best late afternoon. These landmarks are usually washed out in the morning, but come into their own just before sunset.
Even though a photograph can never do justice to the real thing, it is still very worthwhile grabbing your camera and taking some shots of Shasta just before sunset. Above you see the upper slopes of Mt Shasta nicely lit in the late afternoon sun. The frosty rock formations give the mountain a magical appearance during this time of the day.
Well, that's about if for High Camp on Mt Shasta's Lake Helen location. For much more on Shasta, just click on the menu above and choose the Mt Shasta option for more information on climbing this beautiful peak.
Email Sign Up

| Join the Adventure! Sign up here for Timberline Trails Monthly Newsletter |

Join us on Instagram
©2006-2022 TimberlineTrails. All Rights Reserved.