 The approach on Mt Rainier, depends on which route you take. The mountain can be approached from all sides, but we have chosen
the Paradise - Camp Muir / Ingraham Direct Approach, which is by far the most popular approach on Mt Rainier. Above, you see climbers on the Muir snowfield closing in on Camp Muir above. To get from Paradise (5,420 feet) to Camp Muir (10,080 feet) you will have to gain about 4,660 feet of elevation. This is a substantial amount of gain, and you will have to carry all your gear on this section of the climb, making it (I believe) just as difficult as the final push to the summit on the next day or two (depending on if you set up camp again at Ingraham Flat). The total elevation gain from Paradise (5,400 feet) to the Summit (14,411 feet) is just a little over 9,000 feet, so your work will certainly be cut out for you if you are going for the summit!
The approach on Mt Rainier, depends on which route you take. The mountain can be approached from all sides, but we have chosen
the Paradise - Camp Muir / Ingraham Direct Approach, which is by far the most popular approach on Mt Rainier. Above, you see climbers on the Muir snowfield closing in on Camp Muir above. To get from Paradise (5,420 feet) to Camp Muir (10,080 feet) you will have to gain about 4,660 feet of elevation. This is a substantial amount of gain, and you will have to carry all your gear on this section of the climb, making it (I believe) just as difficult as the final push to the summit on the next day or two (depending on if you set up camp again at Ingraham Flat). The total elevation gain from Paradise (5,400 feet) to the Summit (14,411 feet) is just a little over 9,000 feet, so your work will certainly be cut out for you if you are going for the summit!To get started, take the skyline trail just outside the Paradise Lodge area, to glacier vista. From there you ascend to Panorama Point and then continue on a short trail spur to Pebble Creek. Most often this trail is snowed in until mid June to early July, so a bit of route finding may be necessary.
The trail ends at 7,200 feet, and at this point you continue up the Muir Snowfield, which is a permanently large area of snow on the mountain. The snowfield will eventually take you to 10,080 feet and this is where Camp Muir is located.
 Above is a map showing our route. We took the Ingraham Glacier Direct Route shown as a blue line in the upper portion of the diagram. Just above the blue line is the more traditional "Disappointment Cleaver Route" That would be the better approach later in the year due to crevasses opening up on the Ingraham Glacier Direct Route.
Above Map used with permission National Geographic.
Above is a map showing our route. We took the Ingraham Glacier Direct Route shown as a blue line in the upper portion of the diagram. Just above the blue line is the more traditional "Disappointment Cleaver Route" That would be the better approach later in the year due to crevasses opening up on the Ingraham Glacier Direct Route.
Above Map used with permission National Geographic.
 In the photo to the above right, you see a climber working his way upward in white-out conditions. Mt Rainier most often is under cloud, and you need to have excellent navigational skills with map and compass, or be able to navigate with a GPS in order to stay on course. Most often, you will be able to follow the multitude of boot prints left behind by previous climbers. This is due to the popularity of our particular route option. Following the well worn path is what we ended up doing. But you cannot always count on this, and wind or snowstorms can quickly cover the tracks, forcing you to use your navigational skills. Above left you see a photo of Camp Muir. This marks the end of the Muir Snowfield and it is a great stopping point for most climbers who are working their way to the summit. From here, you will go onto the Cowlitz Glacier, and this is where you will want to rope up. Crevasses are a constant danger on most all glaciers.
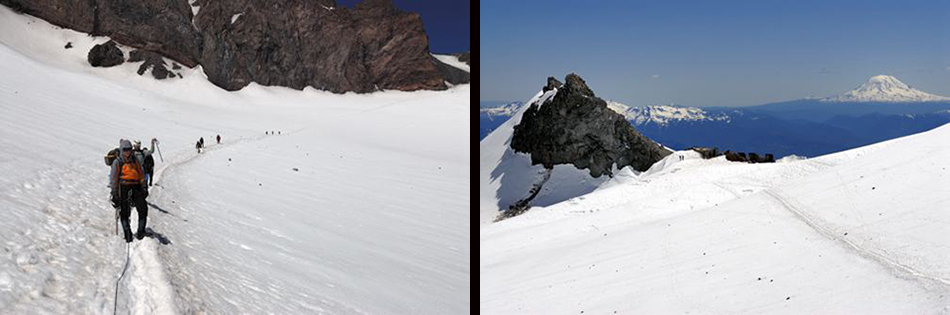 The above right hand image shows you a view from the Cowlitz Glacier looking back on Camp Muir with beautiful Mt Adams in the background. In the photo to the above left, you see climbers following the well worn path up the Cowlitz Glacier just outside of Camp Muir.
Also, in the upper right hand corner of the above left image, you can just make out "Cathedral Gap" (10,640 feet). From there, you will climb another 360 feet to Ingraham Flats which is located at an elevation of 11,100 feet. This is another great camp site for climbers looking to shorten their next day summit attempt.
 Above left, you will see a photo that shows the upper section of the Cowlitz Glacier and the notch known as "Cathedral Gap." After reaching the "Gap" it is a short climb to Ingraham Flats camp site.
Then above right, you can see a climber working his way up to the above mentioned notch. The Cowlitz Glacier covers an area of 1.3 square miles in the southeast flank of Mt Rainier and its starting point is just a bit above Camp Muir located at 10,080 feet. The Ingraham Glacier's covers an area of 1.5 square miles and begins at just under the 11,000 foot level and extends up to 12,660 feet.
 To the right Above is an image of the Cowlitz Glacier from above. If you look closely you will be able to see a string of climbers on the right hand upper portion of the picture.
An option for the route from Camp Muir to Ingraham Flats would be to go through the high pass via Cathedral Rocks (this gap is known as Cadaver Gap). You will still be ascending the Cowlitz Glacier from Camp Muir, but you will ascend the north-northwest side of the glacier and will skirt the upper bergschrund to the 11,250 foot gap just above Ingraham Flats.
If you decide to take this option you need to be careful of conditions and for potential avalanche danger. It is steeper than going over Cathedral Gap, but it is more direct and some climbers prefer this. It also avoids getting behind a crowded group of guided climbers.
 In the image to the left, above, you can just barely see a climber exiting the "Cathedral Gap" and making his way up to Ingraham Flats Camping Area located at 11,100 feet. The party in the foreground is already set up camp at this beautiful location. This is the second campsite after Camp Muir. Climbers as mentioned above use this site in order to get some rest and make the following summit day easier.
We stopped at both Camp Muir and Ingraham Flats. We were able to spend a restful morning at Camp Muir, and even spent some time practicing crevasse rescue. We were able to get to Ingraham Flats in good time and were able to set up a nice campsite and enjoy the sunset. Needless to say we were well rested for our summit bid early next morning.
We took off for the top at around 12:30AM with headlamps at full power. By doing so, we gave ourselves a much better chance of not breaking through delicate snow bridges and were able to avoid potential rockfall from above. Our chosen route out of Ingraham Flats was the Ingraham Direct Route. It was shorter and less prone to avalanche than the Disappointment Cleaver Route and we were early enough in the season to make it work to our advantage. But the Disappointment Cleaver Route is the better option later in the climbing season. The reason being is this. As the Ingraham Direct Route melts out, many crevasses open up and make progress much more difficult. But no matter which of the two routes you take, they both join up just above the cleaver.
 To the right Above you see the upper portion of the Ingraham Glacier. This is the view from Ingraham Flats at 11,100 feet and you can see all the way to the top of Ingraham Glacier at the 12,666 foot level. You then hit the Emmons Glacier and it will take you to the summit crater which is at
14,150 feet.
To the right Above you see the upper portion of the Ingraham Glacier. This is the view from Ingraham Flats at 11,100 feet and you can see all the way to the top of Ingraham Glacier at the 12,666 foot level. You then hit the Emmons Glacier and it will take you to the summit crater which is at
14,150 feet.This upper portion is the hardest, due to the altitude and thin air. All along the route you will encounter 30 degree slopes if you follow the established route. But if you get off route, anything goes, and you could hit very steep ice.
Below left, you see a climber crossing over a ladder spanning a crevasse. The ladder was placed there by the Rainier Mountain Guides. This crossing was on the Ingraham Glacier over a fairly deep and wide crevasse. As always when on a glacier remain roped up, and make sure to always be on the alert for a potential fall by yourself or one of your teammates. It is super important to get an early start on summit day. The reason being, as mentioned above, is that snow bridges and other dangers such as falling rock become much more of a problem as the sun beats down on the mountain. Clear skies along with cold temperatures are your friend when it comes to mountaineering.
 In the above right you can
see large crevasses on the lower portion of the Ingraham Glacier with the Ingraham Flat Camp Site in the upper right hand corner. These crevasses are obvious but you must remain alert for the hidden ones too. This is why being roped up is so important and why solo climbing on Mt Rainier is so dangerous. An un-roped fall into a crevasse would not be a pretty picture, and serious injury or even death is often the outcome.
In the above right you can
see large crevasses on the lower portion of the Ingraham Glacier with the Ingraham Flat Camp Site in the upper right hand corner. These crevasses are obvious but you must remain alert for the hidden ones too. This is why being roped up is so important and why solo climbing on Mt Rainier is so dangerous. An un-roped fall into a crevasse would not be a pretty picture, and serious injury or even death is often the outcome.
 From the upper slopes of Ingraham Glacier, you have great views of Little Tahoma (the pyramid looking peak on the right side of the photo) and the terrain below. From here, you will ascend the Ingraham and Emmons Glaciers to the summit on 25-30 degree slopes. If you have had the adventure of climbing Mt Shasta via the Avalanche Gulch Route, the angle of the snow slopes are similar, but without the crevasses that are present on Mt Rainier.
Below left, you see a photo of the large summit crater which spreads out at 14,150 feet. Only 261 feet to go to the summit, but you must cross this wide snow filled crater to get there.
Many climbers already exhausted from the climbing in the lower portion of the mountain, sometimes under estimate the amount of energy it takes to get up this last 261 feet. I know I did, and ended up taking a few breaks before I was able to reach the top. It can also be very windy and cold on the crater, due to its exposed position on the mountain.
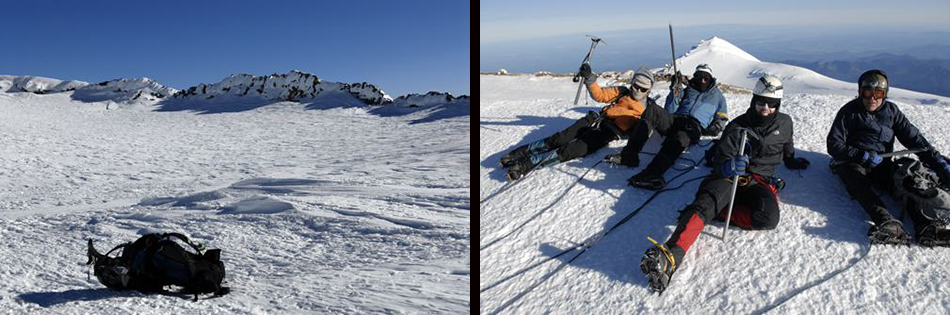
 Finally in the upper right hand photo just above, you see our group on the summit. A real good feeling to know that all that hard work has paid off. We are now at 14,411 feet above
sea level, making Mt Rainier the tallest of all the cascade mountains in the Pacific Northwest.
Finally in the upper right hand photo just above, you see our group on the summit. A real good feeling to know that all that hard work has paid off. We are now at 14,411 feet above
sea level, making Mt Rainier the tallest of all the cascade mountains in the Pacific Northwest.To the right, you see a climber descending from the summit with a spectacular view of Mt Adams in the background.
It's all downhill from here, but always keep in mind, your climb is only half over, and take note that 80% of climbers that loose their lives, loose them on the way down. The reason for this is usually exhaustion, and a tendency to relax to the point of complacency because you think the worst is over. You can never let your guard down when climbing.
So that's it for the Approach/Climb section on Timberline Trails for Mt Rainier. As always, we pray that you have enjoyed the write-up, and that it will be helpful to you if you decide to take on the great adventure of climbing Mt Rainier.
All God's Blessings to you,
Dave French
Email Sign Up

| Join the Adventure! Sign up here for Timberline Trails Monthly Newsletter |

Join us on Instagram
©2006-2026 TimberlineTrails. All Rights Reserved.
....