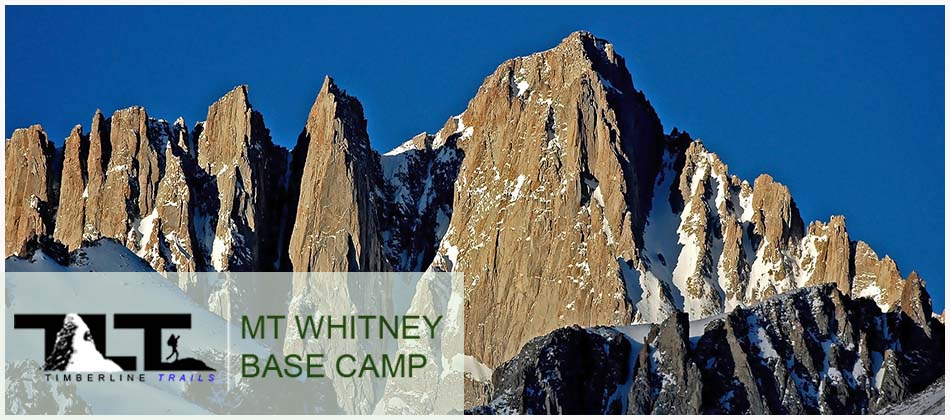
 Mt Whitney - in the California Sierra Nevada is the highest peak in the contiguous United States. Reaching an elevation of 14,508 feet, it towers more than 10,000 vertical feet above the Owens Valley, and because of its lofty position, it is the most sought after peak in all of North America. This fact sends over 30,000 people each year to its slopes, however, only 10,000 are able to complete the journey on the trail. With over 6,000 vertical feet to gain, I figure that lack of conditioning and/or altitude must be the underlying reason for this somewhat high failure rate.
Mt Whitney was first climbed by Charles Begole, Albert Johnson, and John Lucus. The so called "Fisherman." They completed the summit on August 17, 1873. The first woman to climb Mt Whitney was Mrs. Anna Mills. She completed her summit of Mt Whitney on August 3, 1878.
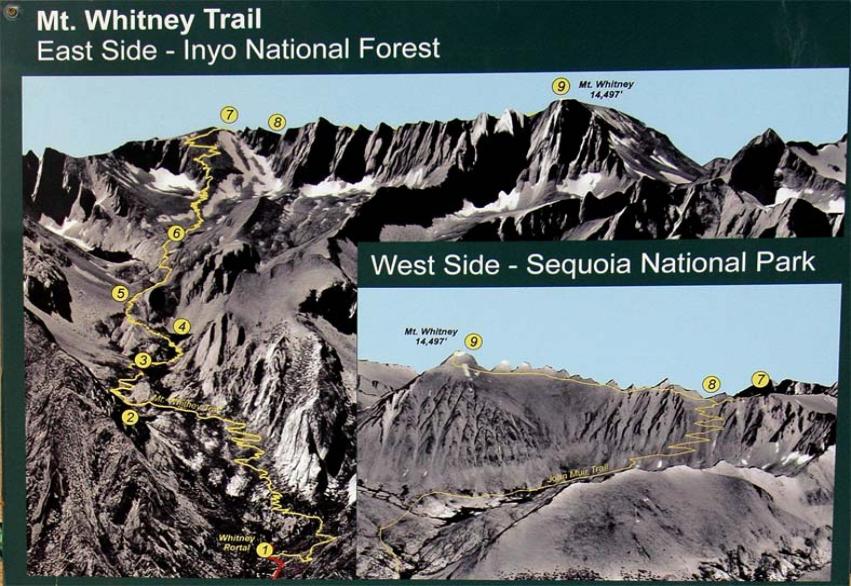
The Mt Whitney Trail is the easiest way to get to the summit. The trail is a well maintained 11 mile long foot path to the Summit. The trail begins at 8,360 feet above sea level, and tops out at 14,508 feet. A bit down this page you will see a diagram that shows the location of key landmarks and a chart showing the mileages. Another quick way to get a feel for Mt Whitney (and all it has to offer) is to watch our Mt Whitney Aeriel Slideshow. It will give you a quick overview of the entire trail and surrounding areas from both the ground and the air.
 Permits are required for both day hikes beyond Lone Pine Lake and for all overnight camping on Mt Whitney. Demand is high during the summer months and the best way to secure a position on the mountain is to participate in the lottery that takes place in the month in February each year.
 Forest Rangers patrol the Whitney Trail on a regular basis and you can be sure that there will be a very good chance that you will be asked to produce your permit at some point on your journey. Inyo Forest Ranger Dave Kirk (see photo), checks our permit at Trail Camp to make sure all is in order.
I remember sleeping in the back of my pickup truck at Whitney Portal waiting for our permit entry date to become valid, and being awoke at about 3AM by a group of individuals being escorted off the mountain by a Ranger for not having a permit.
For more about the Whitney Lottery, costs, and how to obtain a permit, please visit our Getting Started web page. If you have the time and enjoy backpacking, you could approach the Summit of Mt Whitney from Onion Valley or use Horseshoe Meadow Trail (which is the trail that most folks use to climb Mt Langley). Both routes will eventually link you up with the John Muir Trail.
 In the above Aerial Photo that I took in late May of 2013, you can see the John Muir Trail (JMT) marked (in green) hooking up with the Mt Whitney Trail (in red). The advantage of the above mentioned approaches is that it is much easier to get a permit. You will also enjoy many miles of beautiful scenery along the way. The disadvantage is this: Instead of hiking 11 miles to the summit from the east side of Mt Whitney, you will have to backpack about 36.1 miles from Onion Valley, or 33.4 miles if you take the Horseshoe Meadow through Miter Basin. There is also the option of backpacking from Giant Forest/Crescent Meadow in Sequoia National Park via the High Sierra Trail, to the summit of Mt Whitney. But this is a whopping 60 mile one way backpack. Best to have a car shuttle set up if you do any of this route. However, if you have the time, it is a great outing.
 Below, you see the listed mileage to the top of Mt Whitney using the traditional Mt Whitney Trail. It is by far the easiest way to get to the Summit.
| LOCATION | ELEVATION | DISTANCE |
| Whitney Portal | 8,360 Ft | 0.0 mi |
| Lone Pine Lake | 9,900 Ft | 2.8 mi |
| Outpost Camp | 10,400 Ft | 3.8 mi |
| Mirror Lake | 10,640 Ft | 4.0 mi |
| Trailside Meadow | 11,400 Ft | 5.0 mi |
| Trail Camp | 12,000 Ft | 6.0 mi |
| Trail Crest | 13,700 Ft | 8.2 mi |
| Muir Trail Jct | 13,480 Ft | 8.7 mi |
| Summit | 14,505 Ft | 11.0 mi |
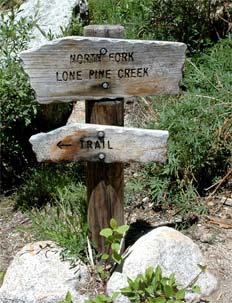 Which Fork to Take - depends on your route up Mt Whitney. If you are taking the Mountaineer's route, or one of the technical East Face routes, you will need to get a permit for the North Fork of Lone Pine Creek. Also, make sure that you do not miss the turn off point about a mile up the main trail.
 Watch close for the trail marker as seen to the left. It is easy to miss. I have been on both forks, and there is no easy way to access the North Fork from the trail if you should discover your error miles later on the Mt Whitney Trail.
We met a couple of young guys who did just that on our last trip on Whitney, and they were not too happy that they had wasted time and energy on the Main Trail when they were informed that they needed to turn around and hike back down in order to correct their error and get back on track. The North Fork is also used for climbing Mt Russell. If your choice is the Main Mt Whitney Trail, just keep going straight up the trail (do not turn off). It is the natural way to go.
Most camping on the Mt Whitney Trail takes place at either Outpost Camp, or Trail Camp.
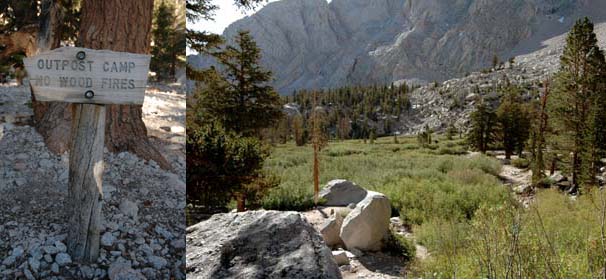 Outpost Camp is located 3.8 miles from the Whitney Portal trail-head and is a good stopping point if you want to sleep down a bit lower at 10,400 feet rather than proceeding up to Trail Camp at 12,000 feet. Some groups decide to tackle the summit the next day from this camp, and others use this intermediate camp in order to acclimate at a slower pace before ascending to Trail Camp. There are excellent camp sites at Outpost Camp and plenty of water available during years of normal snowfall. Being below timberline, Outpost Camp offers a stark contrast with its green meadows and meandering streams in comparison with the rocky terrain at Trail Camp (photo below) which is located above timberline.
Trail Camp on the other hand has the advantage of giving you a great start on the summit in the morning. The reasoning behind this is due to it being 2.2 miles further up the trail and having a 1,600 foot added elevation gain over Outpost Camp. (12,000 ft at Trail Camp vs 11,400 ft at Outpost Camp) It puts you in perfect position to gain the summit the next day.
The disadvantage of Trail Camp over Outpost Camp is if you are subject to Altitude Sickness. If that's the case, then you would be better of sleeping down lower at Outpost Camp. Having a headache or worse all during the night keeps you up and saps your energy for the next day.
There are multitudes of established sites at Trail Camp, and there is no need to create new ones. Make sure you set up at least 100 feet from any water source and well off the main trail. Not only is this a legal requirement, it also makes for a more peaceful nights sleep.

The Mt Whitney Trail is nothing short of excellent. The original trail builders and current maintenance crews have (and continue) to keep the trail in great shape. Probably the most note worthy section is the 99 switchbacks that lead from Trail Camp to Trail Crest. This 2.2 mile section is what most people remember about the trail. The trail here gains 1,700 feet very quickly. It also contains the infamous cables section as shown in the photo which was taken June 10, 2007. As you can see, the snow has melted sufficiently to allow our group to safely pass by walking on the raised stones that have been put in place by the trail builders. The winter of 2006-2007 was a dry winter, and this is why passage at this stage of the year did not present a problem. On a typical year where we get at least an average amount of snowfall during the winter and spring months, this area of the trail can be tricky. This is because hard snow and ice can cover the trail making it so you will need crampons and ice ax during the spring months.
Make sure to check conditions should you decide to go in the earlier part of the year. The Eastern Sierra Inter Agency Visitor Center located in Lone Pine will usually have up to date information on trail conditions. (Phone# 760-876-6200)
Make sure to check conditions should you decide to go in the earlier part of the year. The Eastern Sierra Inter Agency Visitor Center located in Lone Pine will usually have up to date information on trail conditions. (Phone# 760-876-6200)

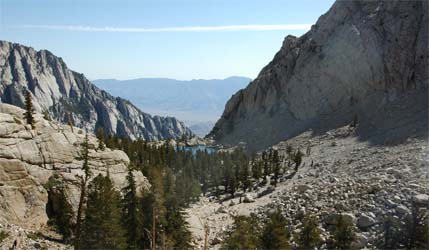
Mt Whitney is not only the highest peak in the Sierra Nevada Range, it also claims the honor of being the highest point in the Continental United States. But this is only part of the story. Mt Whitney also has some of the most beautiful scenery in all the Sierra Nevada. You will find yourself stopping frequently to take in the many wonderful views as you progress up the mountain.
Each bend in the trail seems to offer new and changing vistas. But if I had to choose just one scene as supreme, I would pick the view at Trail Crest (as shown in the photo to the right.) (as shown in the photo above.)
At an elevation of 13,700 feet, it is one of the most impressive sights in the whole Sierra Nevada. The view to the west (as shown) looks into Sequoia National Park. The scale is absolutely awe inspiring!!
 Technical Routes The trail is certainly not the only way to the top and if you are looking for something more adventurous (and you have the skills) you can skip the well worn path to the summit and take the more difficult routes. (Permits are still required)
The standard approach to Mt Whitney's East Face Routes is the Class 2 approach via the North Fork of Lone Pine Creek. This approach is much more difficult than taking the Mt Whitney Trail because it can get a little sketchy to follow in places, it has a lot of areas where you will end up doing a bit of rock scrambling, and there is the infamous Ebersbacher Ledges to contend with. But if you are ambitious enough to take on one of Mt Whitney's East Face Routes, then none of the above will intimidate you. I am sure it will be all part of the adventure.
 John Muir himself made his first summit up Whitney via the Mountaineer's Route. (The prominent class 3 section up the steep snow chute located just to the right (north) of the main East Face Route.
And that's not all. There are also many direct east face climbing routes that will challenge even the most advanced climbers.
In the right hand image, you see a marked up aerial photo that I took showing the two most popular technical routes up Mt Whitney's East Face. The Mountaineer's Route is best climbed in early season when the approach is mostly clear of snow, but the steep gully that marks the route is snow filled.
It is much easier to scale the Mountaineer's Route with crampons and ice ax rather than slog up the late season loose scree and rock. The East Face Route on the other hand is strictly a rock climbing undertaking due to it being so steep that snow does not accumulate on the route.
The East Face Route is rated class 5.4 via the Fresh Air Traverse option. For much more on these two technical routes, please visit our page on the Mountaineer's Route and our page on the East Face Route.
So whether you are an ambitious day hiker, backpacker, or highly trained climber, Mt Whitney has a route especially designed for you!
What will I need to take along for an Overnight Trip
I have included the following information on equipment due to the fact that I get so many questions from people about what they should take along for a summit bid on Mt Whitney. There are certainly those well conditioned individuals who can (and do) make the round trip up Mt Whitney and back in a day. And some of these hardy individuals take no more than gym shorts, tennis shoes, and a water bottle (this is certainly not recommended, even for a day trip). While others decide to spend several days and nights on the trail and take everything along except the kitchen sink (not recommended either). So to help out a bit, I have put together the following that I would consider a minimum to take along for a hike to the top of Mt Whitney.
GEAR LIST

- Hiking boots and a well fitted full size pack (in early season add an ice ax and crampons).
- Clothing:
- Synthetic or wool socks
- Fleece pants or some other equal for protecting your legs in the cold.
- At least one fleece (or equal) jacket (2 layers if you are subject to getting cold)
- Hat that can add warmth to the head area (and also provide sun protection).
- @Gortex or other breathable water resistant/proof Jacket and pants this combination can also act as a wind barrier. (Very important)
- Lightweight synthetic or wool long underwear.
- Gloves
- Pillow case. (Great for stuffing your jacket and clothing into. Makes for an outstanding pillow with hardly any extra weight)
- Water filter: (Filtering your water supply is a must on a heavily populated mountain such as Whitney.
- Headlamp: (make sure you have spare batteries). If you are caught out in the dark by underestimating your assent and decent time. The headlamp can be a life saver if this should happen.
- Drinking Water: At least three Liter (approx 3 quarts) capacity water bladder with a drinking tube. I would highly recommend the @Camelback. It makes for a fantastic lightweight day pack on summit day and fits nicely into your main pack. On most of my wilderness backpacking and climbing trips, I place the @Camelback into my main pack and use it for my water supply. On summit day, rather than taking my heavy main pack to the summit, I simply remove the little
 lightweight day pack out of my main pack and head for the summit. It has all the water I need plus enough storage room for lunch and other essential items. You could certainly use water bottles, but I find a drinking device such as a @Camelback to be superior because getting your water bottles out can be a hassle and you then become less likely to drink. For more on this subject check out our page on Water/Dehydration
 - Bear Canister: for safely storing your food. (A requirement on Mt Whitney) Not only does it keep the bears out, but equally important, it keeps the pesky marmots from ripping up your gear and eating you out of house and home. These critters are everywhere on Mt Whitney. Especially at Trail Camp where the pickings are good.
- Food: See this Link HERE for suggestions. Try and go as light as possible but have a sufficient amount for your trip. (Obviously) Also add a lightweight stove and fuel to the list if you plan on cooking. Don't forget matches or some other way to ignite the fuel.
- Human Waste Sacks: provided at the Ranger Station (All solid human waste must be packed out). This is now a requirement on Mount Whitney.
- Assorted Items: Sun Screen, Bug repellent, and other toiletries, along with sun glasses, First Aid Kit, and Pocket Knife.
- Sleeping bag: (Down or synthetic). Along with the bag, you should carry a lightweight insulating pad and place it between the ground and your sleeping bag to eliminate the cold from coming up from the ground and into you!
- Tent or Bivy Bag: to protect you and your gear in case of rain night or day. (Again storms can come out of no where, and I have come across even experienced hikers and climbers who got caught out in storms. A couple of guys nearly lost their lives due to this oversight. Wet gear is deadly. Also, the tent or bivy bag protects you from the wind.
- Map and compass (even though it is unlikely that you will get lost. Lots of people on the trail throughout the quota period).
- Large Trash Sack: to cover your pack if it should rain in the night.
- Camera: You won't want to miss the opportunities to document your trip.
Note: I would consider the above a minimum. Storms can come up at any time and if you are not prepared, they could become life threatening. For winter conditions more gear would have to be added. Absolutely no cotton clothing. Cotton will have no insulating value if it gets wet, and it will quickly wick warmth away from your body. You can substitute "Down" for fleece, but make sure that your water proof layer is in tact if you choose this option. Like cotton, down is useless when wet.


Also check out the following page: Whitney High Camp It contains other points of information and safety tips. Please take careful note of them. Also take some time out to check the general climbing safety notes located at the following link: Climbing Safety Basics
Each of us is responsible for our own safety in the wilderness, and even though I have been hiking and climbing for over 30 years (and been up Mt Whitney multiple times), I am still not above forgetting an item here and there. So check out other sources before setting out on your adventure. Double check and make sure you have everything you need for the trip. Forgetting important items can make the difference between a great trip, and an exercise in misery (or even worse).
So in conclusion, be safe, and have a wonderful trip. It will be a lifetime memory for you!
Email Sign Up

| Join the Adventure! Sign up here for Timberline Trails Monthly Newsletter |

Join us on Instagram
Deeper Insight -
Mt Whitney is one of the most sought after summits in North America. Multitudes of people each year attempt to hike or climb to its lofty summit. But why is this? Certainly the fact that Mt Whitney is the highest peak in the lower 48 states plays a role, but it is certainly not the highest peak in North America. Mt McKinley at 20,320 feet claims that honor. So there must be more. Most likely this more has to do with accessibility to large numbers of people, and the fact that it has a trail to the top. This makes its summit do-able for multitudes of folks that would otherwise lack the technical skills that would be required to conquer a peak such as Mt McKinley. What is it that draws one to seek to endure the hardships of scaling any peak? Because it is there? Is it the adventure of it? The chance to stand higher than all ones surroundings? Is it to test oneself? Any of these reasons can play into the answer to the above questions, but the reasons as to why adventurers are drawn to the vertical wilderness of this earth are as numerous as the sands on the seashore. My reasons for climbing have changed throughout the years, and will most likely continue to change as I age. But the most important reason why I love to hike and climb is because I see my Maker's handiwork everywhere I go. God's imprint is on His entire creation, and without a doubt, it is something beautiful to behold!!
Psalm 8:3-9
When I consider your heavens, the work of your fingers, the moon and the stars, which you have set in place, what is man that you are mindful of him, the son of man that you care for him? You made him a little lower than the heavenly beings and crowned him with glory and honor. You made him ruler over the works of your hands; you put everything under his feet: all flocks and herds, and the beasts of the field, the birds of the air, and the fish of the sea, all that swim the paths of the seas. O LORD, our Lord, how majestic is your name in all the earth.
©2006-2026 TimberlineTrails. All Rights Reserved.
....